DIY Crafts: Marbled Ornaments

It seems crafts are definitely in the air as I tackle on something that I’ve seen around the Facebook feeds and Youtube front pages over the past year and while it was for some other things like car aesthetics and such, I decided to try to do it for ornaments as I did some research and some people do it as well.

This was a learning process so most of it was a failure BUT, I think I had one that turned out okay and the other ones, I’m going to redecorate so that they can be used for tree. As for why its a failure, I’ll talk about at the end. The process in general works but its more the execution…

Anyways..let’s check it out!

Craft accessories

Marbled Ornaments

  • Old nail polish
  • Clear baubles (mine are glass, but they do sell it in plastic..not sure how that would end up though)
  • Room temperature water
  • Old container (not reusable for any edible items)
  • Toothpicks
  • Cotton swabs

How to do it:

Marbled Ornaments

  1. Fill the container with room temperature water. Take the nail polish color(s) you want to use and drop it into the water. It should float and expand.
  2. Quickly, use the toothpick to make the patterns (if its multiple colors). I believe you can for single color also but I haven’t tried before.
  3. Use a glove if you want to cover the entire bauble or dip it half way to wrap it up. Remember to use a cotton swab to pick up any left over colors from the water before re-emerging the bauble from the water.

Marbled Ornament

Voila! That’s the final and most successful one (at the sixth try)!

But I’m not going to cheat all of you out of all my failures as well so here’s all six of them…

Marbled Ornaments

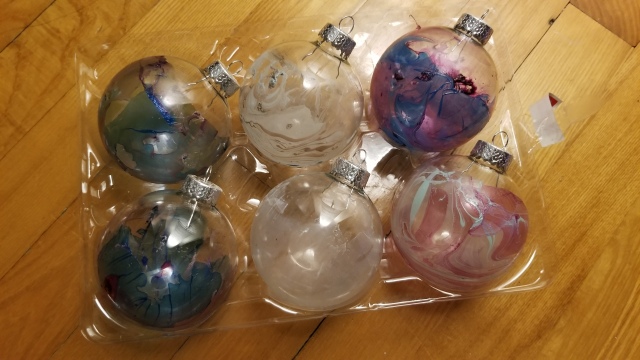
Look at it like how you’d do a C shape and that’s the order of how it was done.

  • The first was the result of not having a cotton swab to pick up the excess so it dragged all over it creating a huge thick smush. The colors aren’t bad but that blob doesn’t work with it.
  • Two and Five has the issues of mostly choosing bad colors so it just blended together into a whole lot of nothing.
  • Three and Five suffers a bit from the first issue I had but also had these issues of the toothpick dragging too late and it had already formed the film so the colors moved all into a bunch
  • Six is by far the best one both in marbled effects as well as the color combination

There you go! That’s the little DIY Marbled Ornaments that I did! Its really a lot harder than it looks. I wanted to try it to get rid of all the old nail polish that I can’t use anymore because its separated or whatnot. I wonder if using not so separated one would be better even if I did shake it to make it work. There is a big nail polish fumes emitting from the bauble though. So you will want to air them out a lot before using these DIY Ornaments.

Other than that, it is pretty fun to mix and match colors and work on this. Like I mentioned above, I will probably find some way to incorporate other old things and add some stuff to these failed ornaments so that they can be used one way or another to hide the issues on the surface. I’ll see what I can do. Maybe I’ll do an Instagram post on it or something when I’m done.

Have you tired marbled ornaments with nail polish?
If you have, please tell me whether you were successful and where you see my issues are. Any tips and suggestions will be highly appreciated!

DIY Glass Ornaments

Every year this happens.  I budget less time than expected to complete my projects for gifts.  What happens after that? I start stressing out and staying up late to get it done.  Last year, the glass ornaments took me an afternoon and evening to do, then it was letting it dry for the next 3 days or so. They were ready just in time for Christmas.  It wasn’t too time-consuming on that level.

I had posted it up before as part of a photo challenge but here it is again:

P1110360

This year, I wanted to make more glass bauble ornaments and gift them to someone else.  Although, right now, my boyfriend is convincing me to give it to the same person again, being his dad.  I just wonder how many of these bauble ornaments can one need and use, right? Although, the ones I’m doing this year are different and frankly, a bit more colourful. I’ll make my final decision to who I give it to next week, I guess.

These ones took me 4 days to do the whole batch.  I had underestimated the time so now I’m stuck with a few days and two more DIY gifts left to do.  But still, lets be happy: THE SECOND GIFT IS DONE! YA!

P1190883

This year’s baubles was partially inspired by WhollyKao’s DIY holiday decor. Click HERE to see it.  I say partially because I used pot pourri instead of dried flowers and I only did half of the glass ornaments with this and the other half I came up with something else.

Here’s the half inspired by WhollyKao:

And here is my own little skills applied to glass ornaments.  It was my Plan B when I ran out of usable pot pourri. Here’s the result of my creativity:

Although its just putting origami stars into each bauble…so not very creative but I had to rip each strip from different stationary and then fold each one.  A pretty good idea, no? I was going to paint stars or snowflakes on it but then I thought it might be a bit too much.  Should I add that on?

Either way, the results were pretty satisfactory.  What do you think?

My FIRST: One Lovely Blog Award Nomination

I’m still feeling a bit dazed and confused right now.  My first award…its been about one year and 10 months that I’ve been blogging and I’ve read millions of posts about others getting awards and it never occurred to me that it’d happen to me…and it has.  Give me a few moments to wrap my head around this…I’m just happy!

First of all, I’d like to thank Aan at Sigoese for the One Lovely Blog Award Nomination.  I haven’t followed his blog for a long time but he has some amazing content that goes up. You definitely need to check it out.

These are the rules below, as copied from Sigoese for the nominees to follow:

  1. Thank the person who nominated you
  2. Add The One Lovely Blog Award to your post
  3. Share 7 things about yourself
  4. Pass the award on to 15 nominees
  5. Include this set of rules
  6. Inform your nominees by posting a comment on their blogs

Seven Thing About Me:

1) I love music a lot: I play the piano, sing, and am learning guitar (very slowly) and I listen to music every single day.

2) My love for Dragonboat is the reason and motivation that I exercise and train.

3) I am a collector of  Disney(Pixar included) movies and Hayao Miyazaki animations.

4) I have a digestive disorder that makes me sensitive to caffeine, lactose, MSG, and a whole bunch of random vegetables and foods.

5) I believe that crafty DIY gifts mean so much more than any store-bought gift.

6) I watch too many TV series that I can’t possibly catch up anymore (Criminal Minds, Grey’s Anatomy, The Mentalist, Vampire Diaries, True Blood, Vampire Diaries, and some other guilty pleasures like Gossip Girl, etc.).

7) I hate having a cellphone (even if its a necessity) because I see it as a tracking device on my whereabouts.

Now, on to 15 blogs I’d like to nominate:

  1. Thirdeyemom
  2. Lead.Learn.Live
  3. Head In A Vice
  4. 50 Year Project
  5. The Wish Factor
  6. Crazy Train To Tinky Town
  7. Sethsnap
  8. Homemade with Mess
  9. Bucket List Publications
  10. Ali Does It Herself
  11. A Word in Your Ear
  12. Ridha’s Kitchen
  13. Salt and Serenity
  14. Modern Home Kitchen
  15. A Nature Mom

If you are interested in movies, recipes, photography, crafts, travels and adventures, at least one of those blogs will fulfill.  Thanks again to Sigoese for the wonderful nomination!